I had to do many things to get adguard-Home running as a container in fedora Server 43. This is how I set it up on Fedora Server 43, so your mileage with say, Tumbleweed might vary.
There’s a number of steps that I had to take to get this to work correctly and as a brief overview they were:
- /etc/sysctl.conf to allow pasta to bind to port 53
- Stop systemd-resolvd.service from using port 53 /etc/systemd/resolved.conf.d/no-stub.conf
- Use loginctl enable-linger
- run the container as root: /etc/containers/systemd/adguardhome.container
- container start are to be done in cockpit itself
I didn’t necessarily do them in the order above, as I fudged my way through it! Hopefully now you don’t have to!
Before you start:
- Ensure that you can access fedora cockpit via http from your laptop/desktop. You’re going to need access to get this to work. So get that working before starting the below.
- Decide if you want the container to run under your own credentials or another user. I created this set-up to run under root.
- Allow binding to port 53 By default Fedora Server 43 won’t allow you to bind to certain ports, so the best way to overwrite this is to add the following to your sysctl.conf file:
net.ipv4.ip_unpriviledged_port_start=53
You can also do it for IPv6 if you’re feeling fancy.:
net.ipv6.ip_unprivileged_port_start=53
save the file and then run:
sudo sysctl -p
to reload the file.
- To stop systemd-resolvd from binding automatically to port 53, you need to do the following, so that adguard-home ‘pasta’ can connect it instead. So, go ahead and create a new folder like this:
sudo mkdir /etc/systemd/resolved.conf.d/
cd /etc/systemd/resolved.conf.d/
sudo touch no-stub.conf
Add the following to this file, and then save it:
[resolve]
DNSStubListener=no
Once you’ve saved the file, then reload systemd-resolvd.service like this:
sudo systemctl restart systemd-resolvd.service
Make your user lingering! This is an easy step, so for any user you need to enable the following:
sudo loginctl enable-linger $USERwhere chilli is the actual username you want to run the container under. Enable-linger will allow your user account to be available even if you’re not logged-on. Spiffy, huh?Creating the .container file. You’ll now need to navigate back to your home directory:
cd /etc/containers/systemd/
touch adguardhome.container
micro adguardhome.container
Add the following to it:
[Unit]
Description=AdGuard Home
After=network.target

[Container]
Image=docker.io/adguard/adguardhome:latest
# AutoUpdate=registry
Network=host

Volume=/var/lib/adguardhome:/opt/adguardhome/work:Z
Volume=/var/conf/adguardhome:/opt/adguardhome/conf:Z

[Service]
Restart=always
TimeoutStopSec=70

[Install]
WantedBy=multi-user.target
Save the file, and then when you’re back at the cli, type in:
sudo systemctl daemon-reload
sudo systemctl enable adguardhome.service
You service should now be enabled. I know, you want to start it - resist!
- Accessing Cockpit to get the container running.
Log onto cockpit, and go to ‘podman containers’ section. You should be able to see the container for adguard-home, like this:

Go ahead and select ‘run’ and then the image will appear in the “image” section, and so go ahead and click on the ‘Create Container’ button. Make sure you select root, and not user in the cockpit screen.
Fill out the first screen as below, and you can give the conainer a more memorable name if you want to.
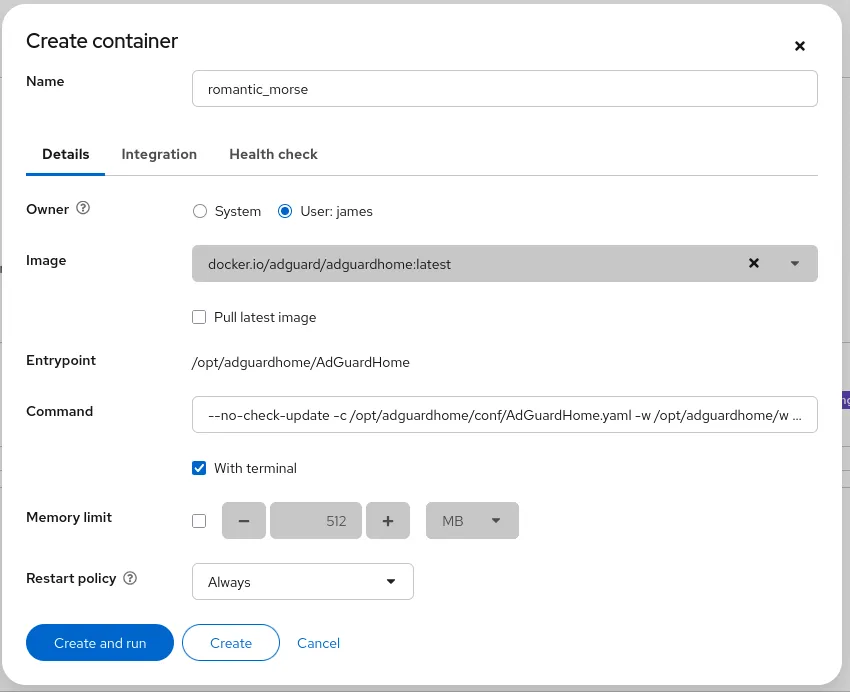
You can then click on the ‘create and run’ button, and it should start-up and run successfully.

The final proof in the pudding is to be able to go visit http://Your fedora server ip address:3000 and see the login wizard where you’ll set-up an account with adguard-home.
So, I’m not an expert on this as this is the first container that I’ve built, and the first time that I’ve used podman. With that in mind, here’s how I see all the apps working together!
In my mind, Quadlet handles the recipes i.e. all the .container files. Podman is the cook - it manages the recipes, and also runs them. Systemd manages the kitchen - it makes sure that the recipes are with the cook, ensures the cook is working, and if not it takes action based upon the recipe to start/restart/stop them.
All the above took me about 5 hours to figure out, and I’m sure that I aged somewhat during the process, and it was a late night for me. Hopefully this will save you some time :)